Sunday, October 17, 2010

Some more cards


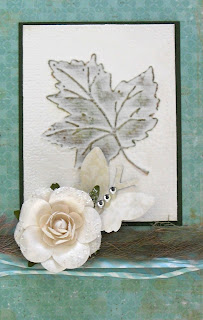
This faux tile technique is fast becoming my favourite.
I've used Green Tara Flowers and Beaded Wire and a little metal butterfly for embellishments.


For this one I've used a Prima Flower (LOVE PRIMA) and some ribbons


Christmas is coming - I've started my Christmas cards
For this one i've used Darkroom Door Stamps from the Noel collection


This one is embossed using the cuttlebug and a docrafts embossing folder of a Christmas Tree.
I've traced the raised embossed image with a glue pen and added silver glitter.


There are heaps of Christmas Card Classes coming up at Pages 2 Scrap so why not come along
and give those close to you a handmade Christmas Card this Christmas.

Check out the class timetable at pages2scrap.com.au

Tuesday, October 12, 2010

Friday Night Classes - 15 October 2010

Looking for something to do this Friday night? Come and have some fun with us at Pages 2 Scrap.

Unit 4, 6 Morton Close
(Corner of Gavenlock Rd and Morton Close)
Tuggerah NSW 2259

Call 1300 664 228 to book

Christmas Cards - 5.30 till 6.30

Cost: $20

We will make some Christmas Cards - Start your stash or make a few for the special people in your life
Even if you are a beginner - this class will be heaps of fun.

We will be using the Cuttlebug and the heat emboss technique for a Glossy effect.


RockStar Layout - 7pm till 9pm

Cost: $30

We will be using lots of distressing techniques as well as using Alcohol Inks on Acetate and 7 Gypsies Rubons
All you need to bring are a couple of Rockin Photos
(Don't worry if you don't have any suitable - Come along to learn some new techniques and have some fun - the photos can be added later.)


I hope to see you there :)

Bec

Sunday, October 10, 2010

This weeks efforts....


I've stamped the Stampin Up Butterfly on book paper with Stazon Ruby Red and cut out.
Stamped the same directly on the background and arranged cut outs.
Outlined with Black Marker and Doodling around the edge.


Glimmermist background with a thin covering of kindy glitz for extra glitter.
Unity Stamps - Tree and wish stamp.
Love the New Unity Stamps available instore at Pages2Scrap


My Favorite circle flower - Very simple card
Flourish Stamp from Unity Stamps.
Happy Birthday Stamp - No Idea - I've had it for about 15 years!!!


Epoxy buttons tied with green tara string.


 Cuttlebug embossed background using Swiss Dots
Photo Strips cut up from Darkroom Door
Acetate Film Strip from Tim Holtz
Distress Inks in Weathered Wood and Victorian Velvet around all the edges.


Some Baby Cards - Darkroom Door Photo Chips and Word Strips
I've also used Stampin Up Ribbon and Adorn It Alphas on the Blue Card


Love this effect.
I've used the Cuttlebug to emboss the background and then swiped Victorian Velvet Distress ink over the top then I worked the colour into the recesses using the inking tool.
Cover the whole image with a thin coating of white gesso so you can see the raised parts of the embossed image.
I then covered the whole image in versamark ink and heat embossed using clear embossing powder.
I then rubbed some vintage photo into any cracks to give it an aged look.

It's so cool - I learn't this technique from Jane Clark.


Thanks for stopping by - Bec

Sunday, September 26, 2010

Quite Nice Classes !!


Yesterday was such an awesome day
I attended two classes at Pages 2 Scrap.
The first one was taught by
We made the 2 following cards using a
really cool technique which basically creates
this really amazing old chipped tile effect.
I had the best time making these - It was messy -
right up my alley!!!!! :)

Jane was a fabulous teacher. I learn't heaps.


The Second Class was taught by

We created this page - Well the sample was similar but
I changed it a little bit to accommodate my title.

Sherry was great and so much fun.


I also sat and scrapped with them for a couple
of hours after at our Monthly Crop night -
They are such fun ladies and it
was such as great day.
I hope they will be back again soon to teach or just to hang out with us.


If you're reading this ladies - Thank you so much XOX
Bec

Wednesday, September 22, 2010

It's Birthday Week !!!!!!!!!

This week I have 5 family birthdays... so I've been busy making cards and I wanted to share them with you.


This one I used my favorite flower on. I freehand cut out the circles this time.
I love this flourish stamp from Kaiser.


The papers on this one are from Pink Paisley.
The flower is make from paper towel that I have used to mop up excess glimmermist.
I've let it dry and used the Tim Holtz Tattered Florals Die to cut the flower shape.


This one is very similar to the one before only a simpler design.


This one is using the same Tim Holtz Tattered Florals Die and I used a Prima Pebble for the flower centre.


This card is embossed using the swiss dots folder and I've used a page from an old book to give it an aged look.

I hope you liked these cards and thanks for stopping by.

HAPPY BIRTHDAY TO Mum, Both my Dads, Nanna and Nerys LOVE YOU XOXOX

Saturday, September 18, 2010

Glossy Florals Class today was a hit!!!


Glossy Florals Class was a hit (I just love teaching It makes me happy) :)

Thank you to the lovely ladies who made my afternoon an absolute pleasure

The kit for this page is available from Pages 2 Scrap at Tuggerah

Bec

Cards


Hey Bloggers, I have been busy making cards from left overs. I appologise for the quality of some of the photos I had packed them in celephane before I took the photos.

Anyway - I just wanted to show you some cool tricks I used that I thought you might be interested in.


I good way to make your alphas pop if you are using patterned alphas
on patterned paper is to outline them.


One of my favourite ways to use these alphas is to spell out the words on cardstock,
trim around them and then
swipe with ink using an ink blending tool or dauber. Also a really good way to journal on your scrapbook pages.


I love these flowers - You will see a lot of them in my layouts and cards
I've explained how to make them in a previous post but wanted to tell you how to make the leaves.
I freehand cut out 3 leaf shapes from patterned paper, I scrunched them up and unscrunched them, I then sprayed them with water and scrunched them again lightly then folded down the center for the spine on with the pattern that I wanted on the outside the I inked the spine. Then I folded them back the other way, I then dried them using the heat tool which helps to give them shape as the paper shrinks a little when wet then dried. I then inked the edges I think they are effective and Easy!! Give it a go.


I don't know what brand of paper this is but it's cute.

I've inked a chipboard slide and heat embossed the whole thing twice to give it super shine before adding the Adorn it Alphas.


This is a cool technique, I embossed some acetate with the cuttlebug and an embossing folder then I painted the acetate with some acrylic paint. While the paint was still a little wet I used a paper towel to wipe it off and also rub the paint into the creases in the image.
It is a cool effect when layered against a contrasting background.


All I did here was layer paper cardstock and ribbon, add a buckle and a rubon sentiment.
Simple but effective I think.


Here is a really cool technique using clear embossing as a resist. I stamped stars around using versamark ink then I heat embossed them.
Then I used my ink blending tool to colour the background with distress ink.
The emboss resists the ink.... How good is that.


Oh I love this background. Same technique as on the canvas I posted on Tuesday.
only this time I used a glue stick and then I used Tattered Angels Glimmer Glam to seal it.

The stamp is from Kazzaz.


This one is really easy.... I just stamped the heart stamp from Tattered Angels with versamark then sprinkled over heat set powder and heated to melt into a glue then I sprinkled it with pink superfine glitter. So easy and so effective.


The background of this card is spritzed with Glimmermist.
I used a paper doily as a stencil.

I LOVE GLIMMERMIST!

This one was using Stampin Up Papers, Music Paper, Chipboard heart and a
button and some Organza Ribbon.


This card I made recently at a Kazzaz workshop... I love it so much I bought the stamp and am trying to get the gorgeous butterfly punch. It's the nicest one I've seen and
Kazazz have changed the shape.

:(


This is Becky Bear - Guess why I bought her!!!
She is stamped with embossing ink and embossed with Tim Holtz Distress Embossing Powder.
You can't really see in the pic but it gives the coolest effect. And it feels a bit like sandpaper.

A really great product.... It will be available at Pages 2 Scrap soon and I will use it in my November It's all About Tim Class.


This paper is so cool for boys, I just trimmed out the robot and used a roll of cog metal tape
(I can't remember which brand it was!)
I stuck it down and sanded it lightly to give it a worn look as straight off the roll it is super shiney.
Then I outlined it to give it some dimension, I stuck on the robot using foam adhesive.


Again I trimmed out the robot and just layered him with black cardstock
and cog patterned paper
These papers are from Kaiser


These butterflies were cut out of patterned paper and stuck on to the same
paper to make 3D butterflies.


The background on this card is done using the Kaiser bubble wrap stamp....
I just used 3 different inks to ink it up before I stamped. I used light green, torquoise and brown.
Make sure you use the light colour first so you don't get dark ink on your
light ink pad and also so it shows up
when you stamp your image.

Thanks so much for stopping by my blog.
I hope you like my cards and try some of these techniques if you haven't already.

Happy Scrappin Bec


Tuesday, September 14, 2010

Class - Glossy Florals - Saturday 18 September 2pm - 4pm


Here is a sneeky peek of the Glossy Florals Class
In this class we will use Glossy Accents to enhance some chipboard and paper accents.
Call Pages 2 Scrap on 1300 664 228 to book your place.

I would love to see you there.

Bec

Pressie for my Friend Shallyn

This is a Canvas I made for my friend Shallyn
for her Birthday.
I've used paper from old books, dictonaries, music books and also some custom vintage scrapbook paper for the background
and also the new and fabulous Tim Holtz printed masking tape
(Thanks Tracey - it was a present from the girls trip to CHA in Chicago).
I used Mod Podge to stick it down and also to seal it
before adding embelishments.
To embellish I've used a Black Twiddlybits chipboard dress form and edge swirls around the Stamped poem which is a stamp from Kazzaz.


The Title "Friends" is Grungeboard Alphas inked with
Black Soot Distress Ink (Tim Holtz) and then
I embossed them with Distress Embossing Powder in Black Soot
also by Tim Holtz (I just love his products).

I used Black Pearl Bling from Kaiser to make the swirls.


The Flowers are made with random materials like denim, tulle,
papers and satin which I cut out using the
Tattered Florals die from Tim Holtz and Sizzix,
I just layered them at random biggest
to smallest and used a brad to secure.

 I just love the poem.

Thanks for stopping by and I hope you picked up some ideas for your next project.
Of course most of the materials for this project were bought from Pages 2 Scrap at Tuggerah.


Bec

Layouts from Pages 2 Scrap Retreat

This layout is of my Gorgeous Aunty Annie and her Grandson Coby. I've used Kaiser patterned paper from the Konstukt Range, Chipboard Swirls which I coloured with Tattered Angels Chalkboard and Pink Paisley Alphas all of which you can pick up at Pages 2 Scrap at Tuggerah.

This Layout is of my Sister inlaw Nerys, We were being silly one night and these great photos are the result. I love them and just had to scrap them. I've used Kaiser Dancing Jewel Papers for the mats in the back and the flowers.
I just have to tell you how to make these flowers I love them and they are so easy. All you do is punch or hand cut out 3 or 4 circles the next a little large than the one before. Distress the edges, spray with water or glimmermist, scrunch them up and un scrunch them again so they have a nice wrinkled look, dry them off with a heat tool. Layer them and use a brad or a staple to hold them all together. So easy and so effective and the more wrinkled and rough they are the better they look! Give them a go you will love them too.
I've also used chipboard which I have painted with a Pearl paint dabber. Thickers from American Crafts - I've inked over these glittery ones a bit to dull them for this layout as they were a bit bright! I've also used a Pink Paisley Pressons which I adhered to a piece of acetate before attaching to the layout for a more defined look.

OK So When I go Pink I really go PINK!!!!
This is Lilly - My little Sister (She is gorgeous)
This layout was something I wanted to try for a while. I wanted to just go nuts with all kinds of different flowers. I dragged out all my flowers that I had and pulled out anything Pink and anything that I could turn pink. I have to say - I love the result. I also love the chipboard twig with the birds - to make the birds stand out I inked them in a contrasting colour to the rest of the layout and covered them in Glossy Accents. This is a great product that you can use for all kinds of applications, best thing about it is that is self levels so you always get a smooth result - worst thing about it is that I am impatient and I always test it too early to see if it's dry - Tip from me always always always leave it overnight. You won't be sorry when you don't have fingerprints in your lovely work!!!

This Layout was a challenge at Retreat. We had some papers and some stickers and were asked to put together a layout using a sketch. This is what I came up with and even though I didn't win. I'm really happy with it.

Thanks for Stopping By.. I hope you enjoyed this post
Bec

Listen Learn Play Layout

I created this layout for a class - I used the cuttlebug with embossing folders by Tim Holtz, Maya Road Clocks, Tattered Angels Tags, Music Paper, Coredinations cardstock and Tim Holtz Inks and if you can see it - I embossed the clock with an embossing folder and then smeared ink over the raised bits and heat embossed. Because I used Green Ink it looks a bit like moss - I love this effect. THIS KIT IS AVAILABLE TO PURCHASE AT PAGES 2 SCRAP TUGGERAH.